
Hello. Kakak Krafter is back after a traumatising DIY Wednesday drama. Dropped my phone while snapping pictures for tonight's post. CRAAAAAAAACK!!!!!!!
There. The deathly white, blank screen. With a very arty crack line somewhere in the far horizon.
Alas, hubby got it fixed today and I am waiting for my two darlings to be home.
(Dear classic old BB, I promise to not mock you for not being the uber stylish S3 or iPhone anymore)
Moving on!
Remember this sneak preview? Well, I had a different plan for it initially but creativity always has a mind of its own so the end result was something which I totally never thought I would try so soon. Pinterest-driven mode again, heh.
Pillowcase dress tutorials have caught my attention much earlier but I always let them sit idle on my pinboard. So on Monday night I had allowed this tute by Prudent Baby to creep its way into my head:
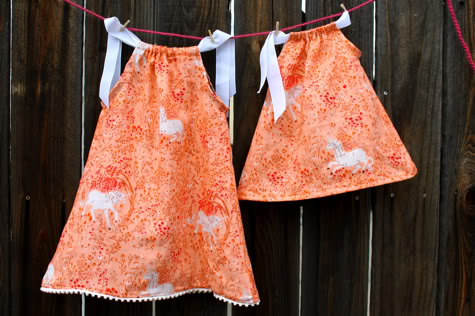 |
| (L) 2T (R) 0-3 months |
Since I am still a newbie at all these sewing affair, I decided that this will be another practice project. Instead of potentially sacrificing a good piece of material I used plain calico because it's el cheapo (RM5.60/m) and in abundance in my fabric stash (more on the stash later. hehe excited!)

Left to right:
- Made a paper template first. I don't trust myself even with cheap fabric.
- All cut up, pinned and hola amigo - fusible tape!!!!! Fusible tape is God-sent when you don't wanna do real sewing, or like me, you are attempting a prototype. Just lay the tape between two sheets of fabric, iron on and they're fused (awesome for DIY curtains too).
- First attempt at attaching a bias tape to hem a curve. It's quite a pain to do this by hand and at this moment I really wished I had lugged mom's sewing machine back to MIL's (where I stay during the week).
- Done after half an hour. Mind you, this is just a tiny armhole and I only did one of four sides to practice and to understand how this bias tape thing works.
- Bias tape is flipped inside giving you a nice curvy hem, no pucker in sight. Okay, mine is ugly, I know. Remember, this is a PROTOTYPE so I really couldn't be bothered to stitch properly. And for a proper project I would use a plain cotton bias tape instead of black sateen, and machine stitch.
THE END RESULT
 |
| Little Miss Prototype |
I won't be dressing Pea up in this, haha. Despite being potentially financially deprived due to my stay-at-home Mom status in months to come, I promise that my kid won't be caught dead in a burlap bag ;D
This was a simple project and yet it was a very good experience at basic dressmaking for a newbie like me, adding on to my list of sewing do's and dont's (see the sides of the hemline? yeah, case in point). I'm already thinking of possible projects out of this prototype. I mean, I can't/shouldn't let this piece go to waste, kan?
For the weeks to come I have to muster the courage to attempt bigger projects as Pea will arrive very, very soon. Can't let the little princess sleep on an itchy mattress, can we? Here's what we have to work on, courtesy of my sister Nyanya from her Korean holiday (please note that I'm paying her back, ehem), my own purchase from LoveandCraft and IKEA. Oh I swear I would have bought more had my husband not stopped me that morning (was it because he's the one paying? hahaha....)
 |
| My sister obviously has a penchant for safari animals ("-_-) |
Bedlinen sets? Curtains? What else, what else?
:D :D :D
2 comments:
rajinnnnnyerrr ko!! terbaik la mummy..aku nak jugakk..hehehe :) untung Pea dpt mummy macam ko kan..hehe
Kalau nak terpaksa la puji lebih. Sekian, terima kasehhhh!!!!!
Post a Comment