Friday, June 29, 2012

Not Exactly Rocket Science to Feed Yourself

My sister made me soy milk from scratch over the weekend because I pulled the pregnant momma trick and had asked her too. She probably last made it when she was still in school back in the yonder years, so it came to no surprise that the result was errrr....somewhat 'scratchy' too. It was way too thick and Sarah was such a dear to have significantly reduced the sugar because of my GD. Tastes like chalk. 

No fun :-/

Fast forward to yesterday, I made the executive (pun intended, hah!) decision to be creative and let no soy 'concentrate' go to waste. It was a wise move. I was (and still am) very pleased with the outcome that had this been a company, a 5-month performance incentive would have been rewarded to every employee regardless of years of service or the invested amount of ass-kissing to commemorate this successful venture. 


Soy Berry Smoothie 

Half a mug of thick, home made soy milk
+
Some frozen mixed berries
+
A spoonful of Blue Bunny's fat-free, sugar-free brownie fudge ice cream

Blend and serve. 

***

Ideally, I should have doubled the stuff. Totally wanted seconds but there was none no more.

Blender courtesy of a wedding guest.
FINALLY one present un-boxed a few days shy of our 1st anniversary.
Waste as little as you can. 
Lick the jar clean if you wanna cos it's sooooooo-y berry sedap!


Little Pea gave her kicks of approval and I hope she sleeps soundly tonight. 
We're doing this again tomorrow, kiddo. Wooooohhooooo!

***

NB
Here in the "beautiful tropics", frozen berries are more wallet-friendly since they're about half the price of fresh ones.
God bless Cold Storage, for I do not yearn for the American farmers' market anymore.
Bitch slap me now, haha!


Thursday, June 28, 2012

Sayang. Sayang. SAYANG!!!!


The lil' kung-fu fighter. 

Wide-eyed and balled-up fists...how can I stop staring back at her? :')

Tuesday, June 26, 2012

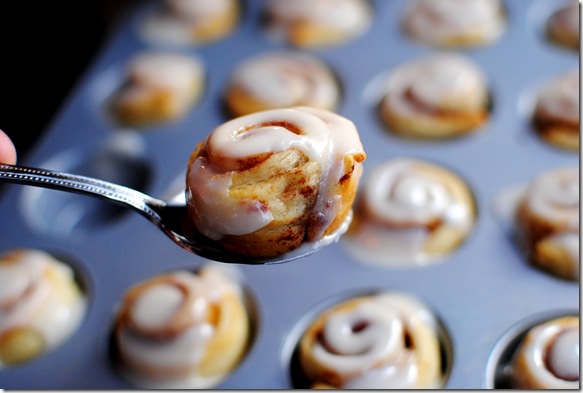
Why Pinterest is BAD for Diabetics

OMG...I so need to make these.

*drool drool drooooooooooool*


8-minute cinnamon rolls via Iowa Girl Eats


Saturday, June 23, 2012

Brownie Pancakes and My Undying Love for Measuring Cups

I have a life-long obsession with waffles and pancakes and poffertjes. 

The only thing I ever wanted as a wedding gift was a waffle toaster but you can hardly find one for the home in Malaysia. Probably need to get one of those commercial griddles, or buy one online. Sigh... 
Since waffles and pancakes basically use the same batter, the latter is the only option when the craving kicks in at home.

Last night, while trolling on Pinterest (damn, it's addictive) I saw a link to Chocolate Covered Katie and  my oh my, there it sat, a sexy and chocolatey glistening pic of a stack of brownie batter pancakes. 

*drool* 

I already have a go-to pancake recipe so all I needed to do was use her recipe as an inspiration and this morning, whipped up my own batch.

ADIEPOT's BROWNIE PANCAKE

1 cup plain flour
1/2 cup cocoa powder
3 1/2 tsp baking powder
1/2 tsp salt*
1 tbs sugar*
1 cup milk
1/4 cup plain yoghurt
1/2 tsp vanilla
1 egg
2 tbs melted butter
1/2 cup nutty muesli cereal*

Whisk all ingredients, except for the egg and muesli, for 2 minutes in a blender or food processor. You can always opt for the bowl-and-egg beater combo the traditional way, but I personally think it takes too much time to smoothen the lumps so why bother when technology is here to make life easier. Heh. 
(By the way, kitchen virgins, please do not use the same machine you've been using for savoury stuff. You gotta use the fruit blender for desserts cos you don't want no garlic-onion-scented chocolate pancakes here. Trust me, I made the same mistake with a smoothie back in primary school. Yuck.)


Scrape down any bit of flour that's sticking on the walls(?) of your blender jar. Dump the egg in and whisk for another minute. When this is done, take off the blender lid and smell the sinfully delicious aroma...

Ooooh....yum. Please don't gulp the batter down your throat even if your greatest vice is uncooked chocolate chip batter. There's salmonella in the egg for goodness sake!
.
.
.
.

Okay, carry on Nadia ('-_-)


Pour the batter into a bowl and add the nutty muesli.


Heat a non-stick flat pan with a tiny drop of butter or oil. Or none. 
Your choice, the fat's going to your behind and not mine.


You can use a medium size ladle for one piece of pancake. Decide on the thickness. Some like it thin, some like it thick and fluffy. For a real brownie-ish taste and texture, I say make it approximately 1cm thick.


Wait till bubbles pop on the surface and the whole thing darkens in colour. Flip it on the other side. It takes about 2 minutes to cook one pancake.
I think. 

Stack all your pancakes up in a cute plate and dust with icing (confectioners) sugar. A dollop of butter and honey drizzles complete your ensemble (and your fatty bum bum, but no one's complaining).

Butter and honey are not included because I saved these for my dad. Don't want 'em to go soggy.

I had the pancakes with a slight drizzle of honey only because of my gestational diabetes issue. I shouldn't even be having any form of sugar or fruits for breakfast, but I allow myself to indulge a little bit on weekends. 

Now let me explain on the * bit:

Use 1 tsp of salt if you're using unsalted butter.

Double or triple up the amount of sugar if you like your pancakes sweet. You can't even taste the sweetness if you follow my recipe, but it's not too bland either. I always prefer to make it up with honey. Honey also gives more 'body' and that sexy rich-in-your-mouth feeling.

I used Dorset Cereal fruits and nuts cereal, minus the dried dates and figs because of my GD.  The nuts and rolled oats really give these pancakes the taste and texture of real brownies.

I also used a ratio of 2:1 for flour and cocoa. This is because I love the bitter dark chocolate. Just use more flour if you prefer a milder chocolate flavour.

Some suggested variations from the top of my head include adding to the batter: 

1-2 tsb peanut butter
mashed up bananas
(or both of the above)
1/2-1 tsp instant coffee (mocha pancakes!)
raspberry/blueberry conserve (black forest pancakes!)

Oh, the possibilities are endless. Like, totally. 

What are you waiting for? Go surprise your other half with breakfast in bed already!

Pea must be the driving force. Eheh.

So, every month I never fail to get a copy of In Style. 
Maybe I don't dress as stylishly as the 'holy book' commands me too, but at least I know what's currently hot. 

So, I have a thing for stripes. Like, always do. And laid my eyes on this baby I did, as I flipped the pages over. 

See that? USD200. Heh.
So, I've also very recently started going gaga over refashioning projects and been buying several pieces of cheap basic tees at the hypermarket. 

Let's just move on to what happened on Wednesday night.

*********

I took the purple tee out of the cupboard and folded it in half. By the way, it's been prepped for when DIY mania strikes, as in, pre-washed so the wax is removed and it can do whatever it's shrinking or stretching thang going.

I then roughly outlined a curved hem line. 


I cut along the (new) curved hem line. 


I measured my shoulder width, and then guesstimated how much needs to be snipped off for a new neckline. In this case, it's approximately 1.25" from the original. 


Then, it's time to work on a new sleeve length. I had two lines here because I am no expert. Marked the outer line first, folded and pinned the sleeve, and tried the top on to see if it gave me the right drape. 
Ekkkkk. Thus the second line inside happened. Haha.


*In the name of God, cut along the marked lines (sleeves and neck) and hope that it turns out fine*

Phewwww....it did.

The Ramones much?


Okay, time to up-style the baby!

I made a stencil out of manila paper for a set of stripes because I'm that anal and I wanted clean lines. 
Other must-have items were as pictured. Last week, I had bought a tub of Dylon fabric paint in bronze and another tube by Folk Art in metallic rose. The former is RM10.90 and the latter is RM7.50 (at almost double the volume). Got my supplies from the Art Friend at The Gardens. Brush is a cheapo one from Mr DIY, at RM1.90 perhaps?

I have a ton of garment covers courtesy of my trusty old dry cleaner peeps. Used one as a floor protector and another (smaller one) in between the tee's front/back so the wet paint wouldn't seep through.

(Yeah, and halfway through the process I realised that the template didn't really work that well and that I should have probably just used duct tapes. Doh!)

Let's get painting. At first I used 'paper weights' on the stencil. Bahhhhh didn't really work. See the colour that runneth over? Le Amateur  "-_-


Then I fixed the back of the stencil with cellophane tape and thankfully it helped.
Mind you, sitting on a cold floor and bending over for the whole night can kill your coccyx and spine, especially when there's a 1kg baby in your tummy. 


And yet I persisted. Tadaaaaaaah!

Done at the strike of midnight. Cinderella doesn't need to resort to her dreadful rags no more.

No, we're not exactly done yet. I let this dry overnight and all through the next day.

Then I happily tried it on. 
Uh oh, fashion faux pas number one: too large an arm hole. Two, actually. 
Haih.

The inner seamstress in me had to work her magic and used the saved scrap fabric from the tee to patch 'em up. Let's remind ourselves that there was no access to a sewing machine here. Nor did I have purple thread, so I just resorted to a dark teal one. It wasn't easy but the trick here is just to 'hentam saja lah. labu....'. This explains the less than inspiring hand stitches, tehheee....


After all the hassle, it's time to iron over the paint to fix it. Else, it's buh-bye hard work when the tee goes into the washer.


So, have we got the steps here? In a nutshell:

1. Prep it.

2. Cut it.

3. Paint it.

4. Dry it. 

5. Errr...fix it.

6. And finally, WEAR IT!

27 weeks+ prego and not really looking like a tub of lard. *pat self on da back*

Next on my radar, another tee with ribbons or jumping into a baby bedlinen set. 

To the fabric store and beyond!!!!!!!!!


p/s: if you're trying this, i would advise for you to opt for the Folk Art paint, not only because it's cheaper but it's also easier to apply. pre-washing, the quality looks no different than Dylon's. Damn the snooty Brits.

Thursday, June 21, 2012

DIY Wednesday

*sneak preview*

The real deal will be up tomorrow. Eat this Lem Lem!

Ewah. Hehe.

Friday, June 08, 2012

Domestic Goddess Hits The Road Again!

Hello, I'm back again with another DIY home project! Hahah, konon. Tak penah-penah buat DIY project sejak banyak tahun lepas. 

So anyhooooo...here's what I made (BY HAND) tonight:

Tadaaaaaahhhhhhh.....my first maternity bandeau top!

I've been very frustrated with the selection of maternity wear in the local market. Not only are the choices very limited, but they're also fashionably unflattering, frumpy, and effing expensive! I've made do with cardis and camis, stretchy knit wear and gathered-waist tops up till my fifth month. Now that the little pea isn't so little anymore, I need to wear more forgiving outfits. But at the same time, I don' think it's wise to burn more holes in my pocket now that I've made the decision to stay at home (yes, I quit my job) for awhile, perhaps till Pea hits her first birthday (yes, it's a girl).

I knew that I must not have been the only mom-to-be in such despair so I looked up online to see how others resolved this problem. As we are all aware of, the Internet is full of answers heheheh... Thankfully I found a lot of inspirations from ladies who sew, and there are quite a shit load of sewing and refashioning tutorials out there. For someone who has very minimal sewing skills like yours truly, a lot of careful reading needs to be done before embarking on even a simple project such as this. I probably read through each tutorial ten times to fully understand what the hell these peeps were doing. Now I know what "serging" means. Tehheee.... For what its' worth, I'm thankful to God that He bestows me with some level of imaginative mind so I could visualise each step carefully, and also the abilty to think through how a few different techniques from different sewing projects can be combined to accomplish what I just did tonight. 

Here's what I had to do:

1. Purchase an el cheapo men's t-shirt from Carrefour.

Okay, this is not the real tee.
I forgot to take a "before" pic, hence had to use my still-intact tee as a mock up for this entry.

2. Cut the upper part off to get a large tube. Cut off approximately 1.5" bit more to use as the errr..."longkang" for the empire waist.

Schematic drawing so I get my pieces right, haha!

3. Use the bottom hem as the top and insert an elastic band. Then attach the 1.5" piece on the wrong side of the material for the empire waist. The adventure began. As I don't have access to a sewing machine, and I really don't wanna trouble my MIL to teach me how to use hers, I settled for my ready tools - my bare hands, rather nimble fingers (bahhahhh!), and an emergency needles and thread kit. 

Sewing almost 80" worth of loop wasn't fun (or funny). I diligently tried using discreet stiches (orang Melayu panggil sembat susup) for the upper line but that took me almost an hour. Gila rasa nak pengsan terbongkok-bongkok menjahit. Dah le stitching tak uniform. Then I gave up and decided to just go with good old straight stitch for the rest of the longkang. I couldn't even be bothered to double stitch! I mean, come on, this is just an experiment and no one will stick his/her face right up my boobs to see how neat this was done, kan? And who would even notice white thread on white fabric anyway? Once the longkang was finally done (whole thing took 1.5 hours) I inserted another piece of elastic to make the empire waist. So here's what we have at the end of it all:

Did not hem the bottom cos I'll need a sewing machine to do it properly. Knit fabric doesn't fray anyway.

4. Model the finished product. Ngeh.

Would look better with blue jeans but I couldn't be bothered to stuff my sweaty bumps into some skinnies just now.
So, how do I think I fared? Very well, me thinks. Even darling hubby was impressed and had no qualms to help snap these photos. Pea was also very supportive, kicking only mildly as if she understood that Mommy needed some time off to do this (she had been extremely active during the day, mind you). 

All I had was the knowledge of basic stitches which I learnt waaaaaaaaaaaaaaaaaaaaay back from when I was 7 or 8 years old. At the time, my mom refused to buy me extra Barbie Doll outfits. I remember bugging my aunt to teach me how to thread a needle and making knots so I can secure whatever I wanted to sew for the dolls. Mom has a habit of stashing fabric and remnants in the guest cupboard, so I kinda had my pot of "gold" to enhance my dolls' wardrobe. Siap kantoi kena marah sebab pegi gunting kain baju kurung belum jahit, hahahaha!


My advice to all arty farty craft moms/aunts/dads/uncles out there:

If kids love to hover around you when you're concentrating on finishing a project, don't brush them away please? Tell them nicely that they can observe quietly by the side. There will come a time when you would actually enjoy the audience and have the patience to answer their questions because trust me, the experience and what little knowledge you impart to them now will prove useful in many, MANY, years to come. There were one too many times that I sat quietly (lepas kena marah sebab banyak soal) by the side, watching nenek, mom, and aunts cooked and sewed. Now I realise that I didn't just watch, but  really observed the little things they did ;)

Ahhh....it feels like I just had a bucket of Kentucky Fried Chicken, skin only. Total satisfaction. Now I'm thinking of making several more of these tops over the weekend. Probably need to use t-shirts of a size or two bigger cuz this bump ain't gettin' any smaller. Also teasing my itchy hands now is a t-shirt maxi dress, of which I found the tutorial over Pinterest (thank God for Pinterest too!). 

To be a finance major who bake and sew, how more awesome can I be? :D

Monday, June 04, 2012

Let's Go Back to Shooting From The Hips!


The Lomo LC-A is all wrapped in Italian red goat leather, and it’s decorated with fertility symbols to celebrate Russia Day and the passionate art of making love. It comes with the original Russian Minitar Lens that started the Lomographic movement. Limited to only 2,000 pieces.


******

Bapak, Mommy kata Mommy sayaaaaaaaang Bapak sangat-sangat! Tapi Pea dengar kat dalam kan, Mommy kata 'aisehmen, ni nak balas apa pulak nanti?'. Can I be your belated anniversary gift from Mommy then, Bapak? Boleh la.....kesian Mommy mati akal sebab for da first time she got upstaged by someone else hahaha!

We love you, Bapak. See, I'm kicking in excitement as Mommy helps me to type this. Can't wait to present myself to you in September!

Hugs & kisses,
Your baby girl